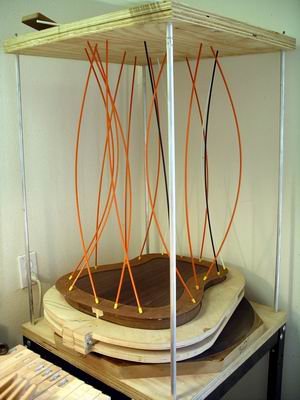
 With the back braced and the sides prepared, I glued them together using the go-bar deck. I have a piece of hardboard that I use to protect the back from the fiberglass rods. Because the sides have been sanded in the radius dishes, I place them on the dish with the radius I use for the top. It's hard to see in the picture, but it is a 30 foot radius. This keeps the sides from being deformed by the clamping pressure.
While the back is being glued on, I turn to the top. After cutting out the soundhole with the dremel, I cut and glued the brace wood to the underside of the top. The brace wood is Lutz spruce as well.
The braces were cut to size and the bottom of the brace was shaped to match the 30 foot radius by using a block plane and sanding in the radius dish. I placed the top in the dish and use the go-bar to clamp while the glue dries.

After the main braces are glued on, they are shaped. I used some measurements from a Martin D-28 to determine how to scallop the braces. I use a chisel and sandpaper to get them to the right height and shape.
I also glued a small piece of spruce on the intersection of the x-braces. This is supposed to improve the integrity of the joint, and prevent it from splitting sometime in the future.
You can see that I omit the thin "popsicle" brace from the upper bout. Since I will be using a double-mortice type of neck joint, I wont be needing it.
I also add a couple of small diamond shaped braces to the center seam on the bottom bout. Here you can see I am gluing on a maple bridge plate and some soundhole braces. After everything is dry, I am ready to glue the top onto the sides. I use the same method I used for gluing on the back.

With the top and back attached to the sides, I can take it out of the form.
The next step is to route a channel in the top and back for the binding and purfling strips. I use the dremel for this step as well.
The binding strips are the pieces of flamed maple that I glued the black/white purfling strips to previously. The purfling for the top will be more of the purfling I used around the rosette. It is flamed mahogany with black on the edges. Since the binding strips are wood, I bent them to match the shape of the guitar using my hot-pipe.

I find the process of gluing the bindings on to be one of the more difficult steps. It is difficult to get the channel just right with the dremel, so I end up adjusting it with a chisel and a file.
The b/w purfling that was glued on must also be trimmed and mitered so that it matches up with the purfling on the edge of the end wedge. After everything is trimmed just right, I put a bead of glue around the guitar and quickly tape everything in place. After adjusting the fit around the end wedge, I wrap some binding tape tightly around the guitar. The binding tape pulls the binding in tight to the sides, so there are no gaps. I found this technique on Robert O'brien's dvd Build A Steel String Guitar.

The technique works pretty well. Here you can see the end wedge. There is a gap, but its pretty small.
After the glue is dry on the binding on both the top and back, I clean up all the glue squeeze-out and trim the binding flush with the top, back and sides. I use a cabinet scraper and sandpaper. Wiping the sides and back with mineral spirits makes any leftover glue film easy to see. If any is left behind, it will show up when the finish is applied.


1 comment:
Wayne, I just surfed in on your site and will keep reading with interest. I'm keeping my own blog, recording all my mistakes building my first kit. www.tedsguitar.blogspot.com
regards
Ted
Post a Comment